Tuesday, February 21, 2017

Perfect Spring Top from Tablecloth


Yes: you read that title correctly! While looking through some cabinets- trying to downsize my overstock of everything, I noticed the trim edging of this tablecloth I almost tossed into the donation pile. We received it as a gift but it was never my style. The trim spoke to me! I have been imagining a dreamy white top with pretty trim for some time now! (Like THIS one or THIS one) So I thought I'd just try and make it out of the tablecloth. I felt like Scarlett O'Hara to say the least. ;)

If you happen to come across such a lucky fabric find, you can make yourself a perfect Spring Top too!

1. Using a (boxy) top as a pattern, lay it on the fabric that has been folded so it's double layered. I cut the arm holes a bit bigger then my pattern shirt just because I liked the idea of it being more roomy. If you have pretty trim on the bottom, line up the pattern and make sure you cut in the same place on both fabrics. Also be mindful of how much you leave. (i.e. I liked the idea of the pattern to seem continuous around the bottom of the shirt.)


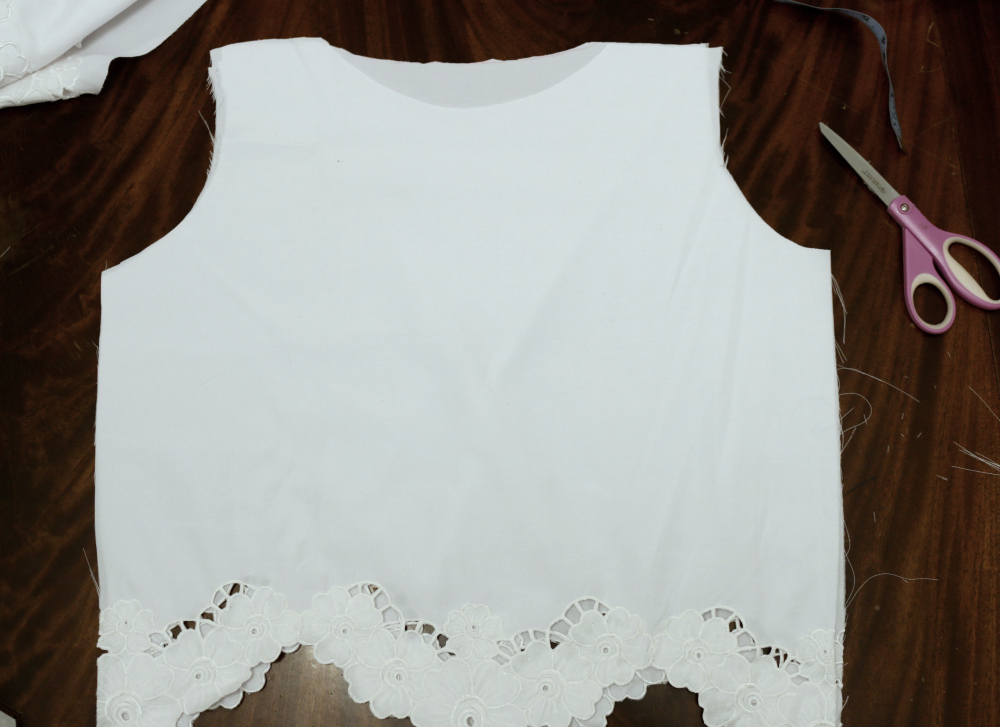
2. Sew the top shoulder part together, laying the fabric right sides together and sewing the wrong side. 


3. Using another pattern for the sleeve, cut out two sleeves. (I had a dissected sleeve for this part. Or you can buy the sleeve pattern in the store. I recommend finding an old shirt you don't need to use as a pattern or buying a pattern. Sleeve shapes are weird!) Since I was making a long sleeve, I also was mindful of the pretty trim around the sleeve. I left the bottom opening 24' and it created a big bell-like sleeve.

Open your two attached body pieces and slide your sleeve up to the opening. Pin around, wrong side up to wrong side up. Sew this nice and slow. It will have an awkward curve.

Repeat to other "arm hole"


4. While still inside out, sew down the side of shirt and sleeve to close off your shirt.


5. Now for the neckline, Cut two strips about 3 inches thick of your same fabric. Using your neckline as a template, arch one more for the front neckline and the back one less arched. Pin around the top of the neckline- this time with the shirt right side out. (Make sure you are marking with washable pencil :)


6. Flip the flaps into the shirt and iron down. Sew around the top as straight and uniform as possible, creating a pretty edge. Pin to insure it stays put..


7. Iron your finished top!! DONE!


I LOVE how it turned out! And love my sweet husband that took his time to take these pics of me. :)  Love you babe.

With love,

Viktoria

Wednesday, February 15, 2017

DIY Pleated Brocade Midi Skirt Tutorial

Happy (LATE) Valentine's Day! Although I did want this to be a Valentine's Day post:  there is no wrong time to make this skirt! Pick a fabric and let's make this! :)

 
 I got this gorgeous pink brocade fabric at Walmart a few years ago and I fell in love with it.

 Velvet bow inspiration from my favorite blogger: Julia from Gal Meets Glam :)

YOU WILL NEED:
2+ yrds heavier/thicker fabric
matching thread
matching invisible zipper
sewing machine
pins


Measure the length you want the skirt.(You can use one of your existing skirts as reference point.) I cut 36 inches from the top (not including the waistband or later hemming) but ended up trimming it more later.

Leaving some room at the beginning (I left 3 inches) and start measuring 2 inch sections, folding the back end into itself, pinning, to create pleats. Keep measuring each one so you have even pleats. Do this all the way across the top of the fabric. Sew across in a straight line.

Measure it around your waist, making sure it fits on your natural waist (above your hips)  Be sure to leave 2-3 inches between your first and last pleat. Trim the sides to fit exactly how tight you want it around your waist, leaving 1/2 in room for zipper.

Cut a 2 inch thick piece of your fabric the length of your pleated skirt top. Fold in half, pin and attach to top of your pleats- attaching the pinned side to the raw edge of your skirt and folded part underneath. Using the same pins, attach the skirt to the strip of fabric. This will create your waistband and seal your pleats perfectly. Sew at top, removing pins as you go.
Flip the waistband up to hide the seams and iron down the pleats and waistband.

Next, install invisible zipper. I watched this video while pinning and sewing my zipper. It was perfectly explained!


Line the zipper up to reach the top of your skirt, including the waistband. (You may need to trim your waistband to end at the edge of the skirt)
Optional: You can choose to attach a hook and eye here to add better closure to the top of your skirt.


After zipper is installed, pin down the open edge of the skirt and close it off, inside out.
(It will not seem like a straight line while pinning because of the volume of the skirt at the bottom compared to top.)

Hem bottom to desired length. This is where I chopped extra off because it was a bit too long on me. I did the hem at an 1in thickness.


Trim all the crazy hanging pieces and you're done!


When looking back at my blog, I am shocked that Valentine's Day is one of the holidays that has the most blog posts. (Well, not reallllly shocked considering pink is my favorite color) Hope you had a wonderful day with your loved ones. Or if you are like us and trying to beat the crowds on Valentines Day, enjoy your weekend date! :)

Thank you for being here! Hope you find the time to make something for yourself this week! Its so good for the soul!

Love, 
Viktoria