Showing posts with label Recipes. Show all posts

Wednesday, February 26, 2014

Chocolate Dipped Pretzel Bouquet

Hello Friends!

Have you tried chocolate covered pretzels?? It's amazing how something so simple can taste so good. If you've never had them: you have GOT to try them! I have made these before just for the sole purpose of eating them all or if I was craving chocolate (which is always).


I had planned to post this before V-Day but we went on a trip and I didn't get a chance to before we left. Gift giving and showing love shouldn't stop just because Valentines Day has passed. I would accept chocolate covered pretzels any time of the year (especially if they are pink and white and glittery) :) I also thought it would be fun to make them into a "bouquet" to show how they can be a fun gift or just put them in a vase and watch them disappear. (because everyone will be eating them... you got that right?)

Aren't they pretty?? You can use any topping that will stick to melted chocolate. I used slivered almonds, and different types of sprinkles. I also left some plain and drizzled chocolate on chocolate.


I doubt you need a step by step but here's what I did:

Melt chocolate (Follow directions on package to proper melting. If doing it in microwave, careful not to over melt and burn! It's such a sad sad sight to see wasted chocolate)

Dip pretzel stick into melted chocolate. It's easier to dip into a deep cup or bowl for better coverage of chocolate (For the bouquet version I left the pretzel sticks long but usually I break the pretzel in half and dip the broken end in. This gives you more chocolate, less pretzel. More chocolate is always a good idea)

Place on parchment paper and sprinkle topping. Or let cool and drizzle with additional chocolate (Or caramel?!)

Put in fridge for fast setting or let harden on counter for a few hours. 


EAT! or arrange into a bouquet, tie with a pretty ribbon and you have the perfect gift!


Thursday, September 5, 2013

A Simple Recipe: Banana Bread

Hello hello! 

I haven't posted a recipe in a while so I thought it was about time. :)


This Banana Bread recipe has been made in our home since I was a little girl. When we first moved to Virginia, we were renting a farm and that's where we met the Lam Family. They were kind and the most selfless and giving people I know. They became dear friends with my family and we are still in touch to this day! (That's a good 20 years ago!) Mrs Lam was an amazing cook. She was also amazingly sweet, never holding back a recipe. (this is only one of the many we still make to this day!!) This amazing Banana Bread was a recipe she shared with us and it is perfection. :) This is an oldie but a goodie!

It is also super easy! If you love Banana Bread, you have now found the perfect recipe. (Thank you Mrs Lam!)

Ingredients:
3/4 cup sugar
1/2 cup soft butter
2 eggs
1 cup (2-3) mashed bananas 
1/3 cup milk
2 cups flour
1 tsp baking soda
1 tsp vanilla
1/2 cup nuts, or chocolate chips {if desired} 

Directions:
1. Heat Oven to 350
2. Grease bottom of a loaf pan and coat with flour.
3. Beat sugar and softened butter until fluffy.
4. Beat in eggs (one at a time).
5. Blend in mashed bananas, milk and vanilla.
6. In a seperate bowl,  combine flour, baking soda and other additons (nuts, etc) Stir together.
7. Add dry mixture to banana mixture and mix until just moist. 
8. Bake for 50-60 minutes, or until toothpick comes out clean.
9. Cool 5 minutes & enjoy! 

(For a printable recipe card, click here!)


Some helpful tips: 

This is great when you have bananas that are starting to brown! They are much softer and make the bread more moist!

I mash the bananas in their skin by squeezing up and down on them. It seems faster than getting a bowl dirty. (Even if it's not faster, you understood you won't get another bowl dirty, right??) ;)

Macadamia nuts are fantastic! Or any kind you have around the house! I love to add nuts but my husband does not. So we usually don't add them. My sister adds chocolate chips. That's a whole different blog post!! (jk, i won't make another post about it but it's goooood)

How do you like your banana bread??

Have a wonderful day, you guys! Thanks for reading...


Monday, February 11, 2013

Valentine's Day Mini Heart Pavlova's

Hi! I'm glad I got this post out before the big day! (Valentine's Day, that is) I love this day! Not only because everything is pink and sparkly (and now GOLD!!!) but also because it's a day to remind you to enjoy the moments and savor your loved ones. Do you agree?

 With a little time, you can show your love with this recipe!
 

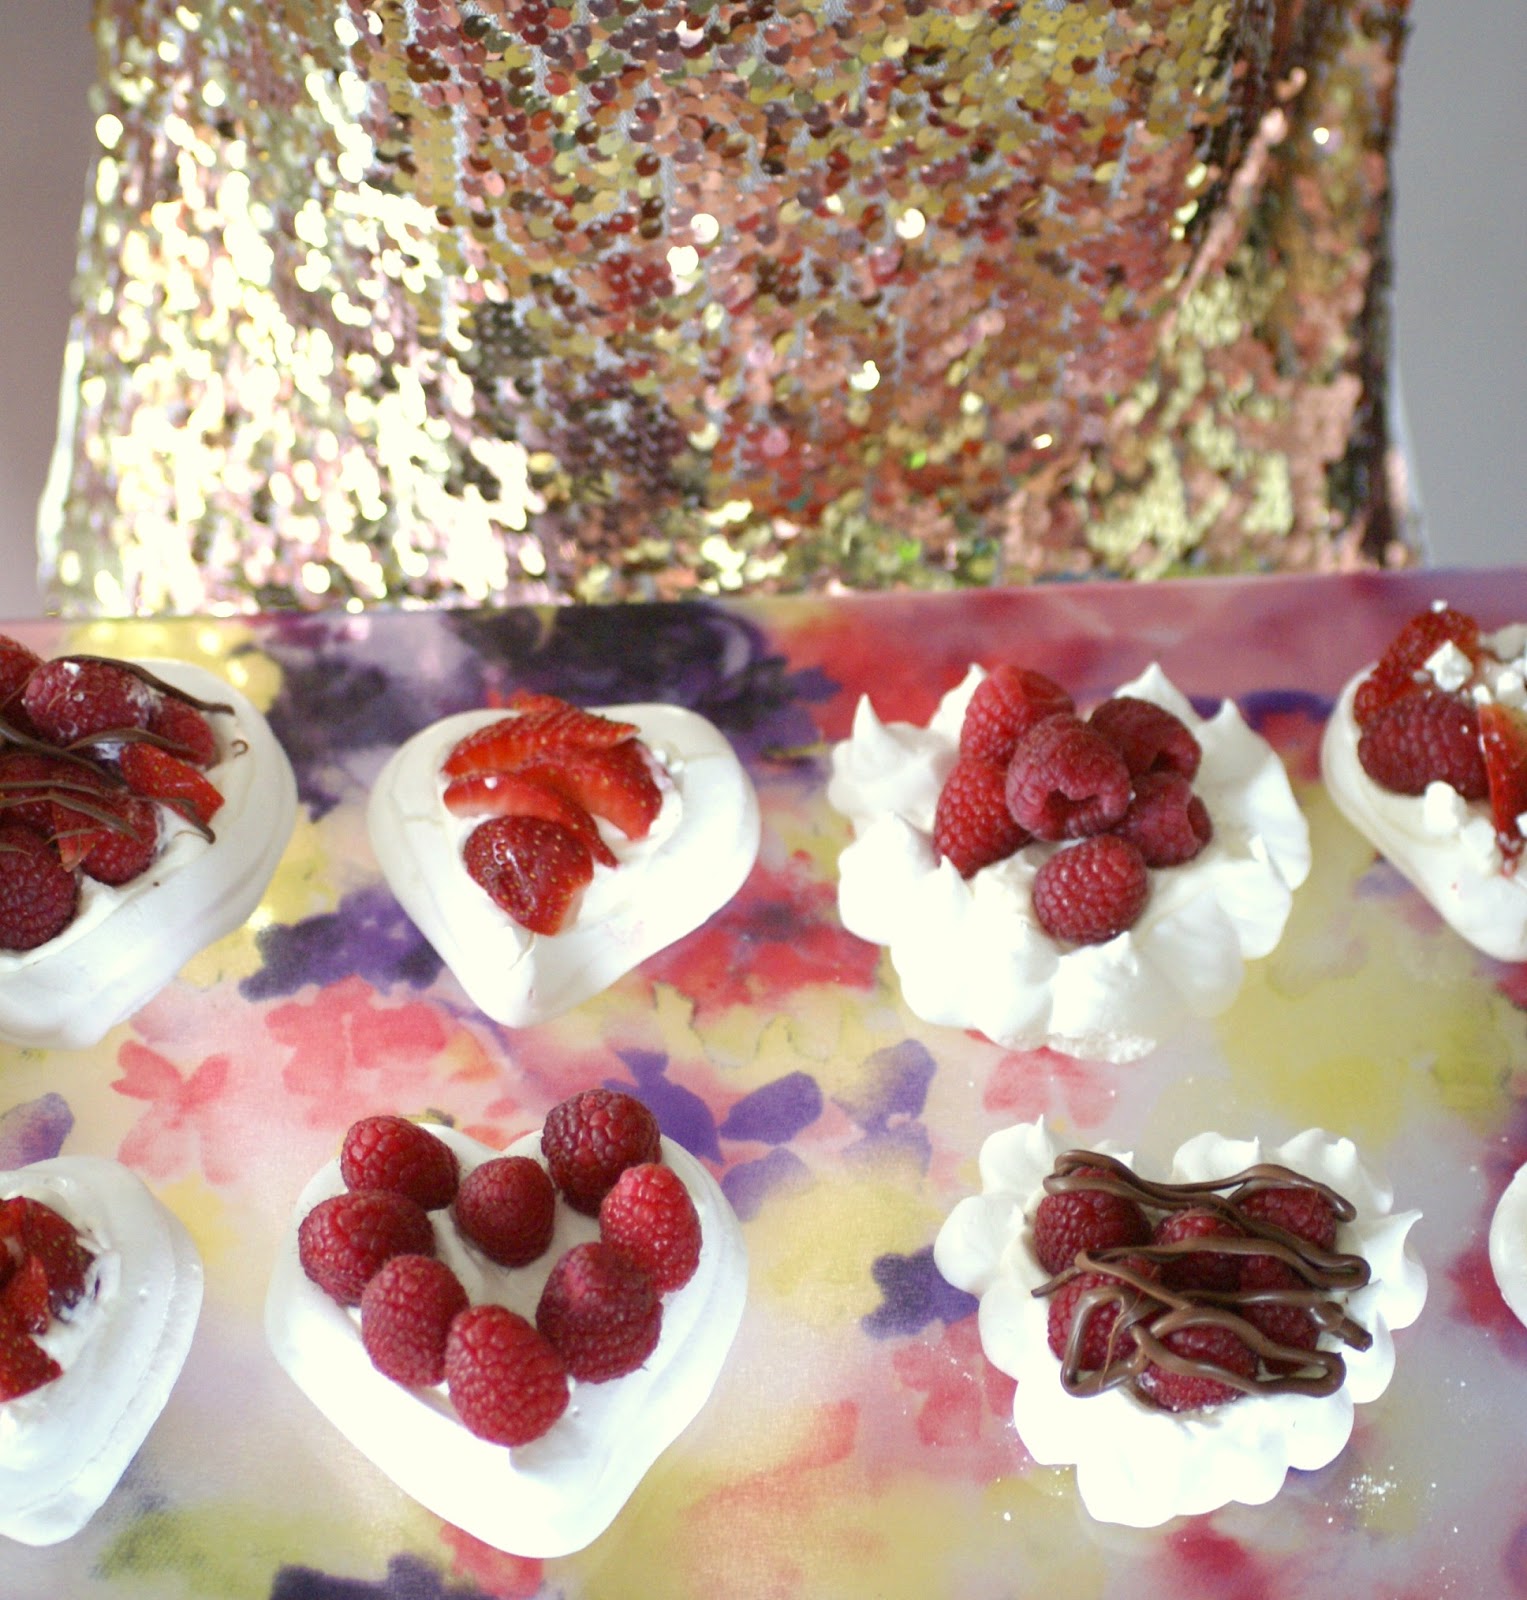
A few months ago, my sister brought a dessert to our place when we were having a little family get together. It was incredible. A large meringue platform with a generous portion of freshly whipped cream and piles (literally) of chopped fresh fruit such a raspberries, strawberries and kiwi creating a colorful and delicious dream come true. I had no idea this existed. 

Welcome, Pavlova, into my life. :)


Thus we had came up with this idea for our mini heart shaped Pavlova. (Yes, I did just said "thus") It is easy to assemble, easier to bake to perfection than the large one and the perfect wow-factor to end a romantic dinner. My amazing sister is behind this genius-ness; I just pretended to be a photographer.:)

This recipe is so simple and versatile, I know you will have fun with it.

To make the meringue:
  4 egg whites (room temperature is better, or you can let them stand in a bowl of warm water for 10 mins)
  1 Cup Sugar (Superfine if you have it)
  1/4 tsp Cream of Tarter

  • Make sure your bowl and utensils are clean and dry. Any moisture will affect the way they turn out! 

  • Beat the whites with the cream of tarter until frothy.

  • Add sugar slowly- no more than 1/4 cup at a time. Give it time to beat in the sugar well. It will be grainy if you try to do this too fast. 

  • Once the cream is thick and creating strong peaks, it is ready! (you will see this using the mixer wisk- when you pull it out of the cream, it will create a peak. If the peak falls back down or is weak, the cream needs more beating. If the peak stays, it is ready. Beware- you can over mix this as well.)  
  • Scrap the bowl and mix a little more to catch any lost sugar

 
On a cookie sheet lined with parchment paper (or foil if you've run out) draw a heart templateI used a cookie cutter to trace around but anything will work! There is no need to space them far apart- they barely change shape.


Put the meringue cream into a piping bag (or a ziploc bag with a corner trimmed off) and start to trace the outline of the heart and fill it in. Go around the heart's edge once more to create a slight rim for all the goodness to go inside.  :) 
 

Bake at 200 degrees for 2 hours. You can turn off the oven and leave the hearts inside if you have the time. This will safely dry them out more. 

These can be stored in an airtight container until you're ready to assemble. I believe they will do well in there for days!
 
For the Filling:
Heavy whipping cream
Sugar
Fresh fruit of your choice

  • Beat the heavy whipping cream with sugar (to taste) until a cream forms. 

  • Dollop a tablespoon or two into each heart.

  • Place the fruit. In addition to fruit, we drizzled melted chocolate chips. (Using the bag technique for easy clean-up, put a cup of chocolate chips in a pastic bag; melt in the microwave for 1 min or so, checking often; cut a corner and drizzle!)
  •  Serve to your loved ones. :)
Some pictures just for fun: We had a blast making these! 


 Our fancy drink: Ginger Ale with a raspberry :)


 My sister's beautiful daughter. She enjoyed these as well. :)

This wouldn't have turned out so beautifully perfect if not for my sister!! There is no end to her talents... I hope to show more of our collaborations in the future. :)

Some history to the Pavlova: There is a long standing debate about whether New Zealand or Australia invented this dessert! It still hasn't been resolved. They know that the name, Pavlova, was chosen in honor of the Russian ballerina, Anna Pavlova. :)

If you have any questions, I'd love to help! Have a great week and hope your Valentine's Day is happy

(Have no one to share this with? Make them anyways. My sister left these at our place and I ate almost all of them.... at one sitting. They are that good.)


Wednesday, September 19, 2012

The Last Days of Summer: White Chocolate and Raspberry Trifle

So I know fall is just around the corner but truth be told, you can enjoy this cake anytime of the year! Raspberries are best priced in the summer but this trifle is totally worth the splurge when they are not. It is so simple and it has a combination of flavors you will crave over and over again! I discovered this amazing indulgence when we went to Florida in the spring. All credit goes to my dear cousin who shared this recipe with us and gave me permission to post it! When we got home from the trip, I made it almost immediately! That's how addicting it is! 
 
That is the reason I am sharing it with you: because I love you and want you to get fat with me enjoy it too! :)


Ingredients:
1 (or 2) Sara Lee Frozen Pound Cake (Family Size)
Heavy whipping cream (16 oz, or more)
Cream cheese (8 oz)
1 cup sugar, divided
1 Lemon
Raspberries (big box or 2 small boxes)
White chocolate for top (optional)


That's it! Another great thing about this recipe? The pound cake is in your freezer when you need it unexpectedly or for a quick dessert. The vagueness in the measurements has to do with the what size trifle you are making. 


  • Beat the heavy whipping cream and 1/2 cup of the sugar on medhigh until a thick cream is formed. (not too thick that it breaks)

  • Put whipped cream into a separate bowl and than beat together cream cheese with the other 1/2 cup of sugar. 
  • Squeeze a lemon of all its juice in a cup. Remove all seeds
  • Put both whipped cream and cream cheese mixture together in the mixer bowl and add the lemon juice. Beat until blended. 

  •  Use half the pound cake for the first layer. Cut the cake into cubes.
  • Put on the bottom of your trifle bowl (or any glass deep bowl will work). 
  • Use half the cream and cover the pound cake cubes.
  • Mash the raspberries

  • Spread on top of cream
  • Cut up the rest of the pound cake and repeat the steps.

  •  Chop or grate some good quality white chocolate and sprinkle on top. I like it chopped in big chunks!


  •  Serve right away or chill in the fridge for a little and it's even better.
I only do two layers but it could be a major wow factor if you do more! That's the flexibility in the recipe. If you decide to do more layers or have a larger bowl, don't forget to beat more whipping cream so you have enough cream to cover the cake. 


I usually do 1 and 1/2 cakes for this size bowl but didn't in these pictures- so excuse how empty it looks! 

Now ENJOY! I am in love with the combo of the tangy raspberries with the chunks of white chocolate and indescribably pleasant cream. I'm just positive you will too.

Back to my usual stuff for the next post! Hope you have a wonderful day. Thank you for reading!

Monday, July 16, 2012

Verison #2 Pelemeni - Russian Style Wontons with Meat Filling

Hello world. 

I want to get this posted as soon as possible so my brain can relax and move on and stop feeling like I'm forgetting to do something. It's like that anxious feeling you get when you know you need to get something done and it nags on you and you can't seem to silence it! Not that you, readers, ever nag me! It's me that doesn't want to disappoint. Or its insanity :) Whatever it is, I've finally got to it. 

This is Version #2. My last post I showed how to make Russian Chebureki (dough filled with ground meat and onions) and the coolest thing about this recipe is: using the exact same ingredients but just folding and cooking them another way, you get a complete different meal! So, repeat all steps to #4. I will show them again to those that are too lazy busy to open a separate link. ;)

Ingredients for Dough:
Flour (All purpose)

2 eggs

1 1/2 C Warm water

Salt


Meat Filling:

One pound ground Turkey

One pound ground Pork

Salt and black pepper

1 large onion, minced


Directions:

1. Mix the eggs with the salt and water. Add Flour. I dont have the exact amount but add by the cup full until the dough starts to form. It should be soft. It will be a little sticky still!


2. Knead a lot. Put it in a bowl and cover with plastic and let it rise half an hour. If it is still too sticky to work with, add more flour. If you do that, let it rise again another 20 minutes. 


3. While the dough is rising, make the meat filling. In a large bowl, mix together all ingredients. You can add a splash of warm water if it isn't mixing together well. Salt and pepper to taste. It may seem like a lot of onion but the more onion, the tastier!


4. Cut the dough is three parts. Take out one section and cover the rest so it doesn't dry out. Roll out in a long fat snake form. It should be longer and thinner than you did for the Chebureki. About 1 inch thick. Cut into small pieces also about 1 inch thick. 


5. Roll out into a circle (around 2 inches long) and fill with a teaspoon of meat filling. Fold over. Press the dough together and connect the two tips.  


6. Place on a floured surface and continue until you have used up all your dough or meat filling. My opinion: the smaller, the cuter. What I have pictured is a little big. I personally like them bite size :)


7. Heat water until boils. Salt the water. Throw in the Pelemene and make sure they have enough room to "roll" around. Boil about 5-7 minutes. 


8. Drain and add butter. For about 50, I add 1/2 stick of butter. To be more health conscious, add less butter. We like butter in our family!


9. Enjoy! Add a dollop of sour cream and a dash of pepper if you'd like :)


I'll admit this is a bit time consuming. But totally worth it. You might also like to know that you can freeze these! So get together with some friends, double the recipe and freeze them! Place the folded, ready-to-boil Pelemene on a baking sheet so they are not touching and put them in the freezer. Once they are frozen, you can put them all in a ziploc bag. Keep frozen until ready to boil. 

The honest truth is, I usually make the Pelemene first. After a while, I get a little tried of folding them so I leave the left over dough and meat in the fridge and make Chebureki the next day! :) 


I have another beautiful baby shower waiting to be posted! This was for a boy so check back soon for some inspiration. Hope you have a beautiful summer's day!

Monday, June 25, 2012

Chebureki! Quick and Easy Russian Food (Чебуреки) Version #1

Hi! I decided to show something a little different today: A Russian recipe! Food and cooking are a major part of my life, like it or not! :) Fortunately for me, I enjoy it most of the time. This will be called Version #1 because using all the same methods and just tweaking a little at the end, you can make a whole different meal!


One of my favorite past times were sitting at the kitchen table, watching my mother cook. She was always teaching, always showing. If you know Russian food (or even Uzbek food, where I was actually born) than you know it involves a lot of dough! Don't get scared! It seems like a long process but the beauty of cooking with dough is that break you get while the dough is rising. It always make me feel a little nostalgic when I make traditional Russian food and I want to give that memory to my children. When we were little, we always got a little piece of dough to play work with and that has always been such a fun memory!


Chebureki (airy-like flat bread filled with ground meat and onions) are very easy to make. You can make them for a lunch/brunch or as appetizers for a party. They are best eaten right away when they are still crispy from the frying pan but they are even good cold. (I would refrain from microwaving them because it makes them soggy)


Ingredients for Dough:
Flour (All purpose)
2 eggs
1 1/2 C Warm water
Salt


Meat Filling:
One pound ground Turkey
One pound ground Pork
Salt and black pepper
1 large onion, minced


Directions:
1. Mix the eggs with the salt and water. Add Flour. I dont have the exact amount but add by the cup full until the dough starts to form. It should be soft. It will be a little sticky still!


2. Knead a lot. Put it in a bowl and cover with plastic and let it rise half an hour. If it is still too sticky to work with, add more flour. If you do that, let it rise again another 20 minutes. 


3. While the dough is rising, make the meat filling. In a large bowl, mix together all ingredients. You can add a splash of warm water if it isn't mixing together well. Salt and pepper to taste. It may seem like a lot of onion but the more onion, the tastier!


4. Cut the dough is three parts. Take out one section and cover the rest so it doesn't dry out. Roll out in a long fat snake form. It should be around one inch thick and each chebureka should be 2 inches long. (this is approximate)
5. Roll out the dough on a floured surface into a oval/circle shape a little smaller than your hand. Don't make it too thin. Put about one kitchen tablespoon on one side. 
6. Spread out on half side
7. Fold the other side over and pinch or press around the crescent. 


Note the meat visible on the right side: this is bad! Try to keep it away from the edges because this causes oil to spray and juice to leak out of the pouches.
8. Pour oil of your choice to fill the bottom of a large frying pan. (I usually use canola oil). Make sure it heats very well before you put in your chebureki. It has to be hot. Fry at medium heat.
9. Fry each side for about 4-5 minutes. When you notice the other side browning (pictured above) you'll want to flip them. Make sure when you remove them that the meat has cooked all the way through. You may need to adjust your heat as all ranges don't cook the same. Also, be careful! Even if you fold them perfectly, they can still seep out juice which causes the oil to splatter! Wear an apron for this one!


 Look at that beautifully fried dough! Yumm!
10. Serve after they have cooled just a little. They are very juicy inside and it can drip- beware! :) We like ours with a dollop of sour cream.

I hope you enjoy this! Another plus to this recipe: It works two ways. I will be posting version #2 soon so keep any extra dough and meat filling left that you were too lazy BUSY to finish! :)

If you would like an exact amount of flour I will try another batch and measure to get that number! Half of my mothers recipes are exactly like this: everything is measured by eye. :) If you try this, I'd love to hear how it turned out and what you thought about it! Have a great Monday!