Wednesday, February 29, 2012

$1 Skinny Jeans!

Hi! I'm so excited about this post I can hardly contain myself! If you read the title, you MUST be as excited as I am?? :)

I wear skinny jeans alllll the time. I actually feel funny when I put on any other style. Not to say that's good because I want to wear those GREAT flares. I just can't seem to get used to the way they look on me... Like I always say: once you go skinny, you never go back. :)


Colored skinny jeans are big right now. I love all of the ways people are wearing them. Here are just a few great examples:


Aren't they all so pretty? Its hard for me to chose a favorite color.. and there are so many others to chose from! But they aren't cheap. You can probably score a pair from Ross or TJ Maxx for a decent price but you will never find them for: $1.00!

I went to our local thrift store, INTENTIONALLY, to look for a pair of colored pants to make into skinnies. Call it luck, but I found a pair of kelly green jeans. They were flare and very outdated and I came home to find that they were short on me! But you know what? That's ok! Because with skinny pants, they can be almost any length! (Being tall that's another reason I love them so...) They cost $1.00. If it didn't work out, it was only a waste of $1. If I never wear them again, it was only $1! 

But they did work out and I have to stop myself from wearing them every day!

(This idea is not a "new thing". If you search around, you can find fabulous tutorials of how others did it! I just want to show you that it's super easy! Trust me...)

Unfortunately there are no pictures of how horrible they looked on me before! I will definitely need to do that next time...

Wash your pants and iron (optional but a great idea)

1. Take a pair of skinny jeans that you like the fit of and lay them on top of the pair you want to "fix":
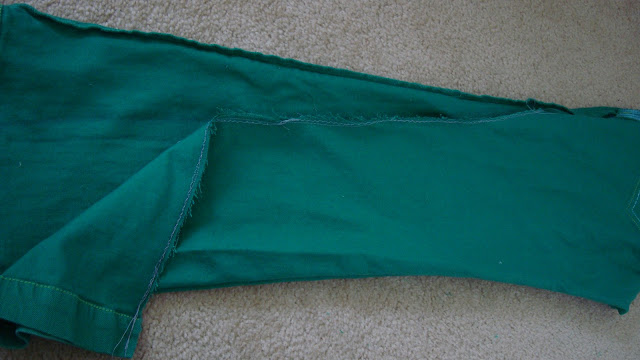
 2. Usually the inside of the jeans have a visible stitch, so plan to sew down the other side. Draw a line with pencil and pin down the line. Make sure the bottom hole is straight and its laying as straight and flat as possible...
 3. If you feel brave, try them on with the pins to see if you like the tightness. Sew down that line. (I did it once regular, making sure to backstitch in the beginning and end than another time on zig-zag to ensure it stays sewn)
 4. Try on (again?) and cut off excess. Lay the sewn side down onto the other leg to make sure you have equal widths.
 5. Repeat steps 2-4!


I played it safe for the first time I wore them but cannot wait to try them out with leopard! :)

Now doesn't that want to make you go thrifting? Or maybe you have a pair of colored jeans/pants in the back of your closet that you haven't wore for years?


Monday, February 27, 2012

Mario Party part 2 - DIY's!

Why hello! Happy Monday to all of you! I hope each one of you had a fulfilled weekend!
It has been beautiful in our corner of the world. I cannot help but constantly think about how blessed I am and how there are so many others less fortunate...
If you are familiar with Pinterest, than you have probably seen this:
(If you are NOT familiar with Pinterest, where have you been??? Get on and your welcome!)
Doesn't that blow you away?? I almost didn't believe it the first time I read it. 

Did I REALLY complain to my husband for possibly the 100th time about not having enough storage space in our home... I'm just too embarrassed to add any more examples but there are LOTS!... But I think everyone needs this kind of weekly (or daily) reminder to be grateful. Content. Satisfied. After all:


A tranquil heart gives life to the flesh, but envy makes the bones rot. (Proverbs 14:30)

And you have to have a heart of love to be able to see the NEED in others. One of my new years resolutions... Remember those? Haha joking! (But seriously, does anyone remember theirs??) ;)

Besides that heavily weighing on my heart, I wanted to share the DIY's I did for the Mario Party! 
I had so much that I wanted to accomplish but time always seems to go by faster than you expect. The one DIY that I absolutely made sure I had time to do were the Mario Hats!  I think they ultimately made the party! The hat idea came to me when my son suggested the party idea and I quickly Google searched for a tutorial. I was so happy to find this: 


This is a much better tutorial than I could show! Or even, why bother when this one is so simple and great and self explanatory! I used different size plates for mine. The middle circle should be much smaller! Like the tutorial says, it stretches and than becomes too big for smaller heads!

I used felt for my M sign and cut out the shape by eyeballing it from the Mario Logo. And HOT GLUE to keep it on-- so much faster than sewing :)


The other quick project I wanted to show is very simple. Those of you with little children probably have endless amount of empty diaper boxes laying around. If your like me, you feel too wasteful to throw them away (..... right away anyways) and you find them piling in your garage. This will get rid of 3 of them for you.

Material:
Diaper boxes, or any other cardboard box shape
Scissors
Tape
Black and Yellow spray paint (preferably the one compatible with plastic surfaces)
Glue stick
Brown Paper (I used cardstock)
Paper Cutter (optional)
Fishing line (to hang question mark)
Paper clip (unless you have a better idea)


Cut the sides to make them more square-like.


Tape around. NOTE: Try to hide the tape as much as possible by taping from the inside. The regular spray paint won't stick to the tape. Or buy the spray paint that includes plastic surfaces.This will help but still won't completely cover the tape areas. Unfortunately we did not know this. That's why our blocks aren't as great as I envisioned...


We made two "blocks" and one yellow question mark. The two blocks were spray painted black on all sides except the bottom.
Cut the brown card stock in rectangle shapes. (this is where a paper cutter is very handy) We made them all the same size and trimmed when needed.
Glue in brick-like pattern.
(see how our paint didn't stick?) :(


Who actually did most the work.. My husband's the best! :)


 We used them to hold our favors, but they are great for adding elevation to food items as well


The question mark was just printed off the computer and glued on as well. We stuck a paper clip through the top middle and tied fishing line to it. Ready to hang!


Everything we did was inexpensive. It doesn't have to take a lot of money to make any event special. Just a little time! :) 

Hope you are feeling happy and loved today!

By the way: we are in the process of making Emma a room! Up until now, the other bedroom has been our "office" and Em has been in our bedroom. This has been a much needed project! Stay tuned. :)

God bless!

Wednesday, February 22, 2012

Mario Birthday Party for my big 4 year old!

Hi there.. I can't quite believe its been over a month since I've posted! Either time has started to go much faster or I've gotten very lazy... it MUST be the former ;) But I do have much to share. Just need to snap a few decent pictures! My latest photographer: my 4 year old son! And he is not all bad :)

FOUR. It still seems unreal to me.. that I have a FOUR YEAR OLD SON. A loving caring brother. A special gift that could only be from heaven above. I thank God everyday for him and pray to be the mother God intended me to be. 


We celebrated his birthday a few weekends ago and his only wish was for a Mario party. That statement always continued with: a Mario cake! If you Google: Mario cake, you will get some extraordinary images! I wish I was that talented!

One of my favorites (for those of you who are too lazy  busy to look it up) :)
http://www.mirauncut.com/top-10-best-super-mario-cakes/

That was definitely not what we had! But I think it was still a huge success (besides the fact that the whole family couldn't come-missed you!). But because the judge (my son) was superbly excited and happy!

In the midst of making star cookies and "mushroom" cupcakes, he hugged me and told me he loved me. He than told me I do everything cool. That blew me away. I'm almost tearing up re-reading that. He didn't care about the presents - at that moment he cared that I was trying to make his wish come true. How innocent and simple children are. And how easy it is to make them happy... It's a huge lesson for me. I spend too much time being complicated and not enough time being happy!

I wanted to share pictures of the joyous event and also some easy DIY's we did to make it more Mario-like! They are very easy- silly even. :)

 Sorry about the color! It was very hard to photograph because of the time of day and the direct sunlight through the doors! 


 The question mark my husband and I made!

Mushrooms and stars 

Cupcakes with buttercream frosting mixed with a half of cream cheese and white chocolate chips upside down

 Sugar cookies with sugar cookie icing- dries glossy and pretty


Angel food cake and fruit trifle

 One of the blocks my husband made! (out of a diaper box!)


 DIY Mario felt hats and crowns for the princesses

Colorful birthday

Ice cream cake from DQ- They will make any image you want! Just bring in a "coloring book" page! They went above my expectations- I brought in the Mario and Luigi picture and they added the Troopa's and mushroom themselves! So nice of them! Great cake, right??

 
The birthday boy... my Mario for the day! With his cousin  :)

Other princesses of the party!

The mini gang

And the picture where everyone is silly!

Sorry for the picture overload! I hope you enjoyed seeing the pictures as much as I enjoyed uploading them! Planning on posting the DIY's tomorrow so check back soon! 

Have a great and productive day!