Thursday, December 20, 2012

Our Bible Group Blue and Silver Mod Christmas Party

Hello hello!

Christmas is just around the corner and this last week always makes me sorta sad...You anticipate it. You long for it as a child. But now that I'm "older", I just want it to linger... I don't want it to be over.

 Alas, it must be so. Along with that, our Christmas Party has passed as well. :( But I am glad to say it turned out amazing and all of us girls should pat ourselves on the back (totally corny, I know). I only say this because it was definitely a group effort and I love that it has a little piece of each of us!


This year we went with a more modern twist using blue and silver as the main theme colors. (If you missed last years more traditional spin, it's here!) Each girl had to make at least one DIY Christmas tree. (many of the girls made two) and we ended up with a forest of DIY trees. Absolutely loved it. We went by this tutorial

 http://www.shaunamailloux.com/2011/12/handmade-christmas-trees-pt-1/

for making the cones (out of cereal boxes!) and it's also filled with lots of ideas and inspiration! Dollar tree also has Styrofoam cones for a $1! Really, there is no reason to spend $20+ dollars to get one of these trees at a store!

The while fluffy stuff I found at Michael's and added glittery tinsel confetti (?) to it to make it sparkle more. I wish I had the exact name but its every where now for the holidays. 

This picture could quite make you OCD- Don't you just want to straighten those candles!! AHH!!

 iPhone pic

For the candles, we used epsom salt which already has a shimmer that looks like snow and added glitter. Everything's better with glitter :)

The plates were from Costco and we found the napkins at Target and Walmart (The silver at Target and the blue at Walmart). The little ornaments were also from Target (dollar section!) and added something special to each place setting


The food table had hanging lights underneath and a large vase holding white spray painted branches. It was pretty dramatic for little money.

The tablecloths were borrowed from a friend and the candle holders and vases were all brought by the girls! So this is our budget friendly festive night! I hope it brings some inspiration to you!

Here are some more detailed pictures of the trees!


We already started to clean up and remembered to take a picture This is most of the girls. (To those that missed it, I'm sorry!)


It was a beautiful evening of sipping coffee and eating really good food and playing very LOUD games. ;) We were all able to get sitters and enjoy each other company without the kids for one night

It was such a fun night and I'm so beyond blessed to have these girls in my life! They are a constant support spiritually and I look up to all of them.
 
 I hope you are surrounded with family and friends and love this holiday season and are able to see how blessed you are! I hope you are remembering the Gift that was given to us on that Silent Night.

God Bless you all. Thank you for reading! I also wanted to add that it was my "blogaversary" just a little bit ago- It's been a year already!! Thank you for being here, commenting and making me smile! I am really thankful for you all

If I don't post again until after Christmas, Merry Merry Christmas to you all!! (That sounded very Santa Claus-ish!! But I mean it :)
Monday, December 10, 2012

Embellished Sweater Tutorial: Giving an old sweater some LOVE

Hi! 

I hope you are feeling the peace and love of Christmas that I wish was around all year long!

My last post I talked too much of the busyness of the holidays and how stressed you can feel at times but I want to change all that. I wish for you a warm, joyful Christmas where you are filled with such awe at the wondrous miracle that IS Christmas and to not to get caught up in the busyness. To linger longer on the important things in your life. For me, this is turning off the media buzz constantly around me. Turn off Facebook or if your like me, Instagram (!!) and enjoy the PEOPLE (little and big) around you. Too fast the days turn into years and I feel regretful for wasting away my life on things that are not eternal. Do you agree?

Anyways, this project is super fast and fun and it'll help add some sparkle to your holiday outfit planning! 


I have worn this sweater an embarrassing amount of times in the week since I made it! (If you follow me on Instagram -byviktoria- you have already seen a sneak-peak!) It's just because it goes perfectly with everything. It's girly yet grown up. (contradiction, I know!) But it adds some sparkle to an otherwise predictable outfit. 

What you will need:
A Sweater (old or "new to you" thrifted as mine is)
Sequins Strechy Ribbon Roll (Walmart for around $2)
Thread that matches your sequins
Pins and a Sewing Machine (although you could hand sew this as well!)


First, decide on what shape or design you want to do on your sweater. I played around with it and loved the heart instantly. The girly sweet vibe is everywhere I look and I adore it!
But the options (as always with me..) are sorta endless. :)

This is where it gets fun! I really liked the plus one. Once I decided I wanted a heart, I googled "heart template" and I got a nice fat one that I blew up to fit the paper.


Try it out for size. It's best to try it on to decide on the best placement. 

If you like my heart: It was 8 cm at its fattest point and 7.25 at the length. 
Trace it with a pencil that will wash off.

I started at the bottom and pinned the sequins around the heart lines with lottsss of pins. The more, the better. Hint: It has be to somewhat stretched around the loped parts to make it lay flat.


Cut off when you get to the top. Start pinning again after that point. (or feel free to overlap the ribbon if you like it better!)

Once it is securely pinned, look it over again to make sure the loops are equal and you like the size/etc. 


Now just SEW. Remove pins as you go but don't worry too much about them that you mess up! I recently realized I still had a pin or two in this sweater!! 


 And WEAR! 


 Throw it on a winter skirt and it vamps it up to a party outfit! I cannot guarantee how well it will hold up in the wash but when in doubt, hand wash and lay to dry.

I hope you will fall in love with an old unworn piece again.  

I would love to see if you tried this!! With other color choices for the sequins ribbon at Walmart, you can practically make any sweater work! 

BTW we are super busy around here planning our 3rd Bible Study Christmas Party! If you missed ours last year, check it out here! We are using different colors and a more modern style this year and I will be sure to post it up if the day ever gets here!

Thanks SO much for being here and stop by again soon! Much love... 

Monday, December 3, 2012

DIY Chic Leather Bracelet (Literally)

The Belt Series: No. 2

So the busiest month of the year has begun. Are you already feeling stressed?? I hate to admit it but if I linger to long on the "to-do" list and the "to-buy" list, I start to panic. I have to remind myself to take it one day/project at a time! 

This one is a breeze. :) 

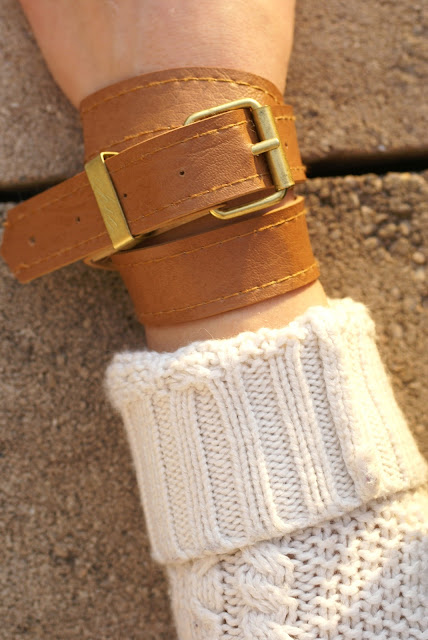
I'm calling this The Belt Series because I have many more ideas for recycling and reusing belts! I hope you have been looking out for amazing belts and have found some great thrift deals.  I found two (!!?) of these that have the word "chic" engraved in the buckle. (I have no idea how I get such lucky finds!) SO this is my Chic Belt Bracelet. :) But yours will be chic too, even if it doesn't say so!

Love it!

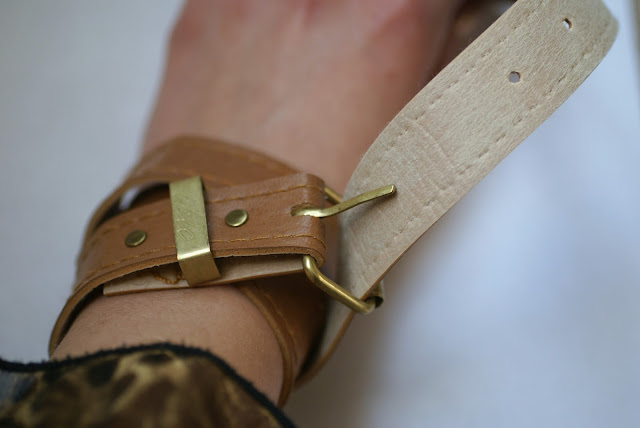
First, wrap it around your wrist and decide if you want it to have two or three straps. I liked the chunky look of three but two would look awesome too (maybe four if it's super thin or one if its that much of a statement belt!) It can be made any way you like. 


You don't want to cut it off right where its perfect because you still want it to have more hole options like a belt. I cut off the last original hole on this belt. (I later adjusted it because it had too much left over and I didn't like the look. Yours might be different but its always better to cut twice and leave room for adjustment!)

Using the piece you cut off for a template, trace around the edge (as pictured) and cut off the tip so it resembles a factory edge. 
Using your scrap piece again as a template, mark where the new holes should be. This way you don't need to measure! Use a leather hole punch or a jewelry hole punch. I'm using a jewelry hole punch that has worked great so far for me and is a cheaper option.

 Done! Didn't I tell you the hole puncher was an investment! Total Project Cost: $1.00

I can also picture this styled this with a floral dress and boots!


It's simple, chic and takes 5 minutes to make. Maybe there's someone on your Christmas list that would love this?? Maybe your family is having a homemade Christmas like we did last year? This is so so easy. Are you rummaging through your closet right now searching for the perfect candidate? I hope so :) Let me know if you do!

My wish for you: thrifting success and stress free days :) Thanks for being here!

Tuesday, September 25, 2012

Muted Moroccan: Shades of Purple and Gold Baby Shower


My sisters and I share an EXTREME joy of party-planning and whenever it's baby shower time (or a party of any sort)  in our family, we are more than happy to plan it! (that is such an understatement, its crazy) We all have our own pieces of inspiration and some how it comes together into a perfect blend. Although I would have to say it's my older sister Zhanna that makes chaos into chemistry. Without her, I'm sure this decor from the baby shower would not be posted! :) 

We threw this shower together for our baby sister. She's expecting her second girl any day now!


The decor was a mix of thrift store finds, some DIY and a few clearance purchases. The gold accent star was from Pier 1 Imports. Purple vase and Moroccan brass jar both thrifted. 


 This unbelievable find was from Goodwill: A genie bottle! Unfortunately the lid was lost so the Genie already escaped ;) But seriously, where would you find this?? Definitely not anywhere  for $2.50!


 A few details... (Gold candle sticks also a thrift store find)

For the table setting we used clear plates and DIY'ed some napkin "rings" using a paper cutter (from Michael's) and gold cardstock paper. The favor boxes were also handmade using this printable: http://www.donteatthepaste.com/2009/08/circle-dot-box.html


The favor boxes were different shades of purple and pink...


 Our DIY lanterns that turned out awfully crooked! :( It turned out to be a little harder than we thought but if you would like to give it a try, head over to:


This flower arrangement was made by my sister in law and she did an amazing job with the flowers we gave her! We used a metal flower pot (originally used for potted plants) and used it in an unexpected way. I love how it looked hanging above the dessert table...

 Can you believe this cake??? It was made by another sister in law and we were all blown away! It was scrumptious. It literally melted in your mouth...

 Trubachkee and our party favorite: Oreshki. Cookie nut filled with dulce de leche

We wanted the food to (somewhat) reflect the Mediterranean theme...

A beautiful salad brought by the showered mom's sister-in-law!  It was beautiful and an amazing blend of flavors!
 Chebureki! Fried Russian dough pouches holding juicy meat and onion.
 Chicken kabobs on mini sticks.
 Peppers filled with cream cheese and wrapped with bacon. A must-try!

 Some shots of the nights...

Had to post this one of my baby Em eating cake. :) She's adorable.

  
Our glowing sister!
 
 Me with my sisters. I can't wait to meet baby girl #2!

I hope these pictures inspire you for the next party you are planning- be it a bridal shower or a birthday party! Gold is very in and I see Moroccan inspired decor everywhere lately! :)And take advantage of thrift stores! You can find some really amazing pieces. If you find a great piece but its not the color you want, consider spray paint. It works wonders.  
(P.S. I can definitely see this being done for a boy party as well!)

Leave me your thoughts and thanks so much for reading!