Showing posts with label Tutorial. Show all posts

Tuesday, March 30, 2021

DIY Ruched Fabric Headband Tutorial (Remake)

 Hello friends!

I recently found a dress at Goodwill that was in the same print as one of my FAVORITE skirt (made by H&M) and I had to buy it. I didn't know what I would do with it. Maybe wear it too?? But then I noticed the cute trend of matching your headband to your skirt and thought that would be so fun to remake my old headband into this beautiful floral! 

Using an old foam headband I never wear, this tutorial turned out sooo easy! Finished it while baby napped, even taking the time to record it AND make a video! Whattttt. :) No post for almost a year, I count this as a win! haha 


Let me know what you think!!! Also, if you're not subscribed to my YouTube Channel, I would be so happy if you would! I am enjoying the other aspect of this blog and being able to share my tutorials in video form (even though I still have a lot to learn!)

You can also watch the video here: 


Hope to make more of these soon! I have about 20 projects that I have actually recorded and hope to find the time to edit and post them!


With Love, 

Viktoria 

Monday, January 7, 2019

Quick DIY Faux Fur Scarf Video Tutorial!

Hello and happy New Years to you all!


It's that time of year again when you make resolutions... to shop less, to spend less. It's also some of the hardest days to get through because you have post-holiday sadness, and the cold, cloudy weather when you are craving sunshine! You could also use some retail-therapy but you spent all your money on Christmas and that would break most of your resolutions, too! Haha! Can anyone relate??

I have the perfect solution for you! And it'll add something special to your winter outfit, for only $10.00.

A Faux Fur Scarf!! I cannot believe how soft and cozy this faux fur is! My youngest girl, Lily, steals this scarf from me any time she gets the chance to curl up in it. Makes me think I need to make her one!


It's a super simple DIY- hardly any pinning or measuring. Under 30 minutes: a few cuts, a few stitches and you'll have your new favorite accessory! Also, it will help you to keep your resolutions, AND keep you warm! :)

All you need:
1/2 YD Faux Fur (Got mine at Hobby Lobby)
Matching Thread

Click this link to go to my YOU-TUBE Channel! (There are also many more simple DIY videos on my channel that you may have missed! Subscribe so you don't miss the next one!)


Beautiful photos by Tamara Chepelyuk!! 

This scarf makes me happy :) Please tell me you will make one! 


Thank you so much for reading! Please comment with any questions! 
I love to hear from you!!

God's blessings to you and yours in the new year!! 

With Love,
Viktoria 

Wednesday, December 19, 2018

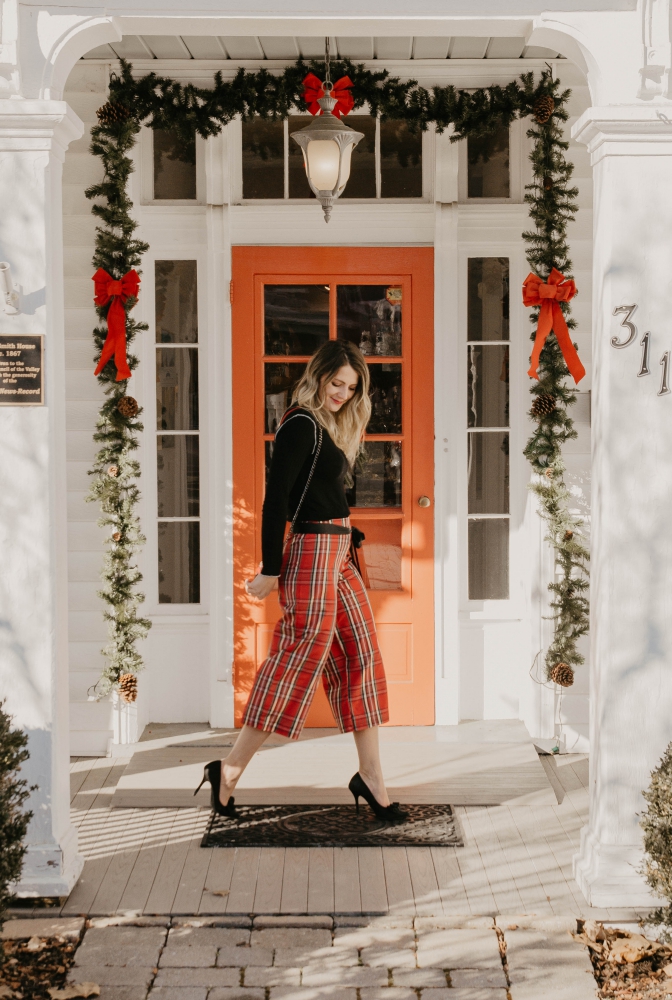
Christmas Plaid Wide Leg Pants Tutorial with Video

Hi Hi!


I love the idea of a dressy pant or jumpsuit instead of a dress or skirt for the holidays. It can be just as dressed up but with a modern twist!

I came across my inspiration picture for these pants from an adorable girl I follow on Instagram, who was wearing sequins pants. I LOVED them. They were the perfect, fun, over-the-top kind of piece you can wear during the holidays and not feel over-dressed. The fact they were wide leg pants was a unexpected aspect. I set out to find sequins fabric to recreate the look...

Unfortunately, our little town didn't have sequin fabric and since I was too impatient to wait for shipping, I found the next best thing in our Hobby Lobby: PLAID. Shimmery, fancy Christmas Plaid, as I like to call it :)

Even though I know this pant would look amazing in sequin fabric, I am very happy with the way they turned out!


These pants would look cute in lots of fabric choices and would also be perfect for New Years Eve!!
Please let me know if you have any questions and I would love to hear feedback! What do you think? Would you wear these?? Not going to lie- my husband said "It's a look" haha. But I love them anyways.


Watch the easy video tutorial on how to make your own!


***Subscribe to my YouTube Channel to be the first to get notified of new videos!!***


Now, for my favorite part: all the pretty pictures (taken by Tamara Chepelyuk)


Thank you so much for reading and I hope this inspires you to try and recreate a look you see this week!!

Have a joyful, peaceful holiday season! 
Merry Christmas from my family to yours! 
May God bless you all!! 

With Love, 
Viktoria 

Thursday, December 13, 2018

Low Back Bow-Tie Top

Happy D E C E M B E R!!!

The happiest month of the year!!


I don't know about you but I love being a little more "dressed-up" during the holidays! Even when I'm just in some jeans, I always reach for a fancier top and a pair of heels. Something that is a little more feminine, something that makes you feel like a girl :)

This is where the idea was rooted. Wanting a comfy top that was still special and dressy.
I started the search in Target looking for a comfy top to refashion and after not finding anything, went searching in my closet. Guess what! Found the most perfect thick cotton top that I had gotten from Target (on clearance) a couple years ago... laying on the bottom of my sweater pile, not being worn. I am sure you can find something too! A solid color would work best (black looks more dressed up) but make sure it's not a knit or silky/ super stretchy fabric (harder to work with!)


I had envisioned this top with a large stiff bow but since I was using what I had on hand, it turned into a more dainty simple tie which I still love! But I give you *creative freedom* to do as you wish! :)

What you need:
-Simple (thicker) cotton or similar top
-Ribbon/sash for the bow
-Sewing machine
-Scissors

Heres the video how-to!!


https://youtu.be/_0g-Knz9pnM

I hope the videos are helpful for you and you attempt to refashion something of your own!!

Please don't hesitate to ask questions!! Let me know if you tried this or it's something you will try!


Beautiful photography by Tamara Chepelyuk 

Happiest Holidays and all the Christmas Joy to you!!

With Love,
Viktoria


Tuesday, November 27, 2018

DIY Star Advent

Hello Lovelies!


I have had this DIY on my "to post about" for over 2 years (made this advent in 2016!) and just kept getting the timing wrong! Finally, it's BEFORE Decemeber and I am writing this blog post! :) Yay!! 

For those of you not aware of what Advent is, it means "coming" in Latin and it's a period of time (4 weeks) before Christmas where Christians await the coming of the Messiah (in our case, the second coming!)  

We remember the longing of the Jews for a Messiah.. 
We realize our own longing for and need of forgiveness, and a Savior. 
We look back and celebrate the birth of Jesus but we also look forward, anticipating the second coming of Christ, as the fulfillment of all that was promised! 

Advent is not something I grew up with and it's relatively new to our little family as well. I have only done it a few times! It is a beautiful way to draw our hearts and attention back to the real reason for Christmas, every single day in December, building up to the birth of Christ!! I enjoy thinking of new ways to incorporate Advent into our Christmas decor and love to DIY it! 

You may also wish to include a fun activity to do that day!
Things like:
Drive to see the Christmas lights
Watch a Christmas movie
Make a Christmas card to mail for someone

See this list for more ideas!! 


What you will need to make the Advent Stars: 

-Brown Paper or pretty paper? (I bought a LARGE roll of thick brown paper from Home Depot or Lowes- it'll be in the painting section- also great for gift wrapping!!)
-Sewing machine or needle & thread if you're adventurous!
-Star template : I included a good starter size star! Too little and it'll be hard to fit anything in there besides the paper slip!
-Markers (to decorate or write numbers on the stars)
-Hole punch
-Pretty twine
-A metal hoop or circular form (I ordered gold metal hoops from Amazon!)
-Little gifts & special candies (optional)
-Print-outs of Bible verses:  I used something similar to these!


1. First, print off a few star templates from the computer and cut out for tracing onto the brown paper..

2. Trace & cut out paper stars. If you are doing all the days of Advent, you will need 25 X 2 (each star needs two sides- front and back) so total of 50 stars. The beauty of this part is the stars don't have to be perfect. Each one will vary a little.. makes it more unique!

3. Start to sew up and down the angles of the star.. leaving a little gap for filling! Again, they might not 100% line up but that little imperfection makes it more rustic!

4. Fill the star with a verse in each (and a fun activity too!) and a special treat, mini toy, etc!
Some examples could be:
Kinder Eggs
a mini ornament for each child
a cute pencil/ gel pen
stickers
a scavenger hunt to find the hidden gift!

If you chose to just include the slip of paper, consider stuffing it with shredded paper filler to make the star have more shape!

5. Sew the hole closed (this is a little tricky if you really filled the star but it can be done!)

6. Write the number on the star for the day it coordinates with!


7. Hole punch a hole on the top corner. Make sure it's not too close to the edge or it may tear away from the star. Loop the twine in and tie to the metal hoop (or whatever you have prepared - even a rustic stick to tie all the stars to!)

I added a branch of evergreen for some color and texture. It was so simple yet makes a big visual impact!


8. Using thicker twine, tie around the circle and knot in the middle. (pictured below) Make sure it's balanced correctly and will hang evenly. I think eventually the weight wasn't even after cutting off random stars and it slide down vertically (See first photo) but still looks just as cute!

9. Hang on a hook in the ceiling (hope your husband doesn't question said hook) ;)


10. You're done! Cut off the star for each number day for the days of December, and tear open to expose the surprise!


I hope your kids and family will love it as much as ours did! They ran to it first thing every morning and took turns cutting the next number loose! They also liked to try and guess what it could be inside!


I hope you will consider starting this new tradition with your family! You never know what tradition your kiddos will remember the most when they grow up but I hope it this will be one of them! 

Have a joyful and peaceful holiday season!!

With Love, 
Viktoria 


P.S. One really fun filler I did for one of the stars was a large quantity of M&M's. When they tore it open, the M&Ms scattered everywhere.. haha that was funny :)

P.P.S. After the stars came off one by one, I added Christmas Cards to the empty strings with cute mini clothespins! I wish I snapped a photo! It's a neat idea for when the stars start dwindling down.


Friday, April 20, 2018

Wedding Guest Style : DIY Floral Wrap Skirt

Hello!

We have been having the MOST bi-polar spring here in Virginia! I know some of you are also experiencing this and that makes me happy that we are not the only ones (What can I say? Misery loves company- haha). But you can rest assured: it will be warm sooooonnnnn!

With that being said, wedding season is upon us and I know many of you are planning on attending a wedding this spring or summer and are already thinking of what to wear as a guest!
For your man, I am SO excited to post about The Black Tux!

This type of service was not available when I was getting married and I really wish it was!  With so many options for ladies like rent-the-runway, the guys in our life also need a service where they can rent a modern, high-quality tux without worrying about affording to purchase it and the unnecessary need of owning it! (Some may have the lifestyle that requires owning a tux but usually, it is bought for a special event then just gathers dust in your closet!)

Check out The Black Tux here: https://theblacktux.com for you next formal event or wedding!! I've included a great infographic at the bottom of this post: It will help you decide what is appropriate to wear to what type of wedding!

As for the ladies, the most perfect and versatile wrap skirt!
Check out the video tutorial here!


I really love wearing dresses to weddings because they are one-and-done: just add a few accessories and you look put together! But I love the way a skirt can be worn so many different ways! This can easily be dressed up, like I am wearing it, with a neutral top and some strappy heels. But it would also be great for a beach wedding: throw on some espadrilles and a straw hat and it's perfect!!

(Pair with a white tee and white sneakers and its perfect for the farmers market tooo!) :)

Hope you enjoy the photos and check back soon so you can see how easy it is to make your own!


Thank you so much for reading!

With Love, 
Viktoria 

Tuesday, April 10, 2018

Dress into Two-Piece Set - Tie Crop-top & Skirt

Hello friends!

Hope the sun is shining where you are!


I have been LOVING all the adorable two-piece sets everyone is wearing lately. You too? All you need is a few clearance finds and some warm weather and you can be rocking it, too! :)

Although some of you may wince at the thought of cutting into something brand new, I want to reassure you that you can find great pieces that are easy for refashioning at great prices in some of your favorite stores! Places like H&M, Forever21 and Old Navy have racks full of clearance items where you can easily find multiples of the same item perfect for this project!

This simple floral dress was on sale for $12. It is a nice thick material and already has pockets (so worth it!) So for the price of $24, I have a cute matching set and also the option of wearing them as separates, too! Or maybe you'll get lucky (unlike me) and find the perfect longer dress from the thrift store to chop up! I searched for months until I finally gave up..

You will need:

Two dresses (with pockets optional) OR a longer dress like a midi or maxi
Elastic waistband
Sewing machine and matching thread

CLICK to watch the video or see below! Let me know what you think!!


I hope watching it is easier to understand! Please do not hesitate to ask any questions or leave feedback!

Thanks SOOOO much for reading! You guys make me smile!


Now, bring on the warm weather!!

With Love,
Viktoria